|
Driveway Seal Coat Information, How to, and Pro's and Con's. Many homeowners wonder whether or not it’s worth it to get a seal coat (also called sealcoating, sealcoat or sealant) for their asphalt and concrete driveways. Sealcoat may seem like an extra expense. However, experts agree that proper application of seal coat is a fundamental component of driveway surface protection. The average life expectancy of a paved driveway is about 15 years. However, high quality and timely sealcoating and crack repair may as much as double the lifespan of a driveway! What is sealcoat? Sealcoat is a thin layer of material applied to finished asphalt or cement surfaces. It is made of either coal tar pitch or asphalt cement combined with fillers, water, emulsifiers, and other additives. Seal coats can be purchased at most hardware stores or from driveway servicing providers, who usually have their own custom formulas. Professionals use large tanks of premium tar instead of buckets sold in stores. Sealcoats are applied to protect driveways from damage caused by gasoline and oils, salt, water, and UV rays. Additionally, sealcoats improve the appearance of asphalt driveways, in particular, by hiding discoloration (usually caused by pavement oxidization over time) under a neat black finish. The most notable benefit is sealing small cracks and fissures so that water cannot easily penetrate through, which can cause more serious cracking and erosion of the top layer of driveway asphalt. Larger cracks can be filled with hot rubber which repairs deep cracks and prevents small cracks from growing into larger ones. What are the benefits of a sealcoat? In addition to improving a driveway’s appearance by giving it a uniform color and texture, good sealcoats slow oxidation by filling the small spaces between particles on the driveway’s surface. This keeps oxygen and the sun’s rays, as well as oil, gas, and other destructive elements, from sinking into the pavement’s surface. Similarly, sealcoat protects from water damage, in which water soaks into and enlarges existing cracks, particularly in areas where temperatures fluctuate between thaws and freezing. 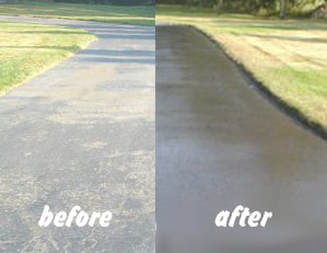 How often should I apply sealcoat? Most experts recommend applying new sealcoat every two to three years, depending on extreme weather and heavy traffic. When should I apply sealcoat? Before applying sealcoat to a paved surface, you may need to repair any damage, such as potholes or alligator cracks, existing in the driveway’s surface. This is particularly important if the cracks go through to previous asphalt layers or all the way to the dirt below. Remember, sealcoat is a protective layer. It is not meant to repair structural problems in your driveway. Experts differ in opinion on how long you should wait to seal your driveway after finishing repairs. Some claim you should wait six to twelve months, while others say you only have to wait four to eight weeks. Your best bet is to check the instructions on the sealcoat you purchased or ask the professional you bought it from for advice about that particular formula or ask your paving expert. Waiting the proper amount of time before applying sealcoat is necessary in order to let all areas repaired with hot mix to properly harden and fuse with the surrounding surface. How do I apply sealcoat? Because sealcoat is water-soluble, it should be applied at a time when there will be no rain for at least 48 hours. Beware of lawn sprinklers as well, as they can interfere with proper sealcoat application if used 48 hours before or after the sealcoat is applied. Additionally, choose a time of year where extreme temperatures will not affect the sealcoat’s ability to dry and cure properly. Good conditions are usually thought to be when the temperature is in the range of 60 degrees Fahrenheit. Sunny weather is ideal, as sunlight helps the sealcoat cure faster. When can I drive on it? Driving over a drying sealcoat should also be avoided when possible, but even thought the material would not be cured, in hot and dry weather, sealcoat may be dry enough to drive on in as little as 30 minutes after application. In most cases, it is recommended to stay off a recently seal coated driveway for a full day if possible. How can I apply sealcoat DIY style? To apply sealcoat, you will need mixed sealcoat (check the instructions for mixing on the sealcoat you buy, as how to prepare the material varies by product), as well as an asphalt squeegee, gloves, a face mask, and protective eyewear. You may want one of the white protective suits as well to avoid ruining clothes and to avoid the irritation that can occur with exposure to the product. You may also want to bring along an old paintbrush to get those tricky edges and corners. After ensuring that your driveway is clean (you can use a broom or leaf blower, but be cautious with pressure washers, as your driveway must be completely dry before you can apply sealcoat), retrieve your prepared sealcoat. Working from the top of your driveway, pour the sealcoat in a straight line in front of where you will be spreading it, and use your squeegee to smooth it evenly over the driveway. For edges and hard to reach corners, use the paintbrush. Make sure you exert enough pressure on the squeegee to spread the sealcoat thinly, but not so much that it oozes over the squeegee’s edge. When finished, allow 48 hours for the sealcoat to dry and cure. You can apply a second coat if desired (and if recommended in the instructions). 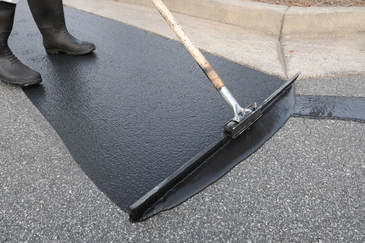 A note about oversealing: If you use sealcoat too often, it can cause more harm than good. Oversealed driveways develop cracks in the layer of sealcoat (thought not in the asphalt beneath). These cracks look unsightly and can run pretty deep. Remember, your driveway doesn’t need new sealcoat more often than once every two years. Save yourself the time and money, and just wait until it’s necessary. How do the professionals do it? The biggest difference between DIY sealcoating and professional sealcoating is that professionals use spray tanks. Edges are still done the same way, but large areas are evenly coated with a large tank that feeds a high pressure spray wand. Professionals also generally fill deep cracks with hot rubber that is not commonly available to DIY'ers. 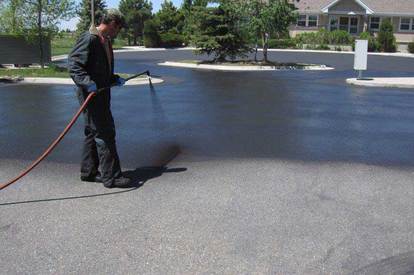 Concrete Driveways The process of sealcoating a concrete driveway is a little different than that used on asphalt. First of all, concrete sealcoat lasts longer—about four to five years. As with sealcoating asphalt, you need to repair and clean your concrete driveway beforehand and wait until a period of dry, temperate weather to move forward with the sealcoat application. A note on selecting sealcoat for concrete: A penetrating concrete sealcoat is a good choice for older driveways. Over time, concrete becomes more absorbent, allowing penetrating sealcoat to soak in and prevent water, oil, gasoline, and other liquids from causing damage. Make sure you understand the instructions for preparation and application of your sealcoat. Concrete sealcoat is usually applied with a sprayer, so it’s important to wear protective gloves, a face mask, and eye protection as well. Move the sprayer in a back and forth sweeping motion to ensure that the product is applied in an even, thorough fashion. Pro's and Con's
A Final Word
There you have it! This article has given you the knowledge you need to make an informed decision about whether or not to sealcoat your driveway. Remember to defer to your specific product’s specifications to find out mixing instructions and the amount of product that will be needed for your paved space. Lastly, when it doubt, consult with your local driveway maintenance company. |
Country RoadsRural drives and private roads are our passion. We post recent jobs, paving techniques, and tips and tricks here. Enjoy! Archives
January 2023
Categories
All
|
 RSS Feed
